
“], “filter”: { “nextExceptions”: “img, blockquote, div”, “nextContainsExceptions”: “img, blockquote, a.btn, a.o-button”} }”>
Heading out the door? Read this article on the new Outside+ app available now on iOS devices for members!
>”,”name”:”in-content-cta”,”type”:”link”}}”>Download the app.
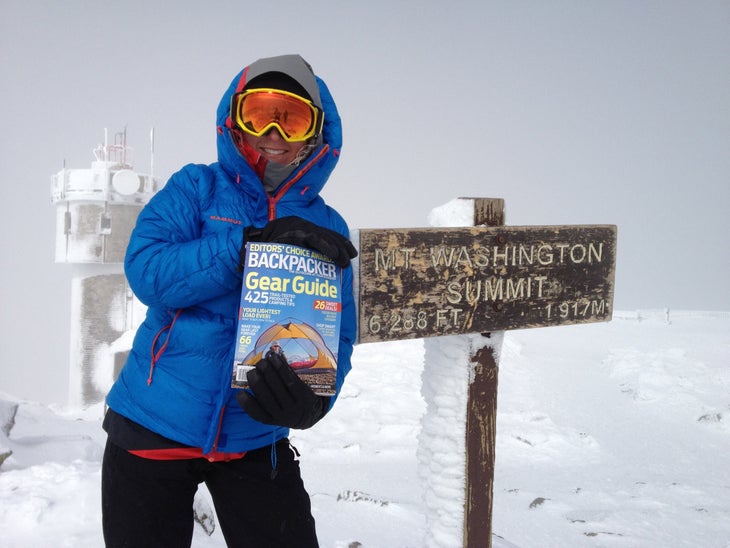
When you think about the deadliest peaks in the U.S., a mountain that tops out at 6,288 feet with easily accessed trailheads and a parking lot at the summit probably isn’t the first one to come to mind. But Mount Washington, the tallest peak in New England, is deceptively dangerous. Between death by exposure, falls, and avalanches, this peak in New Hampshire’s Presidential Range has one of the highest fatality rates of mountains in the entire country.
While hikers should take every peak in the White Mountains seriously, Mount Washington is in its own category. A vortex of weather systems converge over its summit, creating some of the worst storms in the world with little to no warning. The mountain still owns the record for the highest non-tornado wind speed ever measured in the northern hemisphere—a whopping 231 miles per hour. Thanks to its low summit height and ease of access, both local and out-of-state hikers regularly underestimate Mount Washington’s danger. The peak averages 25 rescues each year and has claimed over 150 lives since recordkeeping began in 1849. Victims range from woefully underprepared beginners to expert hikers with decades of experience.
I grew up in New Hampshire—ticking summits off the state’s 4,000-footer list was my first introduction to hiking. I loved the rocky, rugged trails, the feeling of breaking treeline, and the satisfaction of logging another peak. The first time I hiked Mount Washington was during my 2015 Appalachian Trail thru-hike: I was over 1,500 miles into the trail at that point, and I still struggled to keep my foot placement steady on the granite boulders as I inched towards the summit in high winds. I’ve summited peaks in the Whites in all four seasons, but I’ve also had to turn around on multiple attempts, cancel plans when the forecasts turned, and been caught in scary weather above treeline. No matter how much I’ve hiked and backpacked in other parts of the country and around the world, New Hampshire’s White Mountains continue to be some of the most difficult and rewarding trails I’ve ever hiked.
The perils of Mount Washington are no secret and there is plentiful information about how to hike it. But each season, people still fail to give the peak the respect it deserves. The trails are unforgiving, the weather shifts without warning, and there are even signs (that people love to take selfies with) at treeline warning of potential death from exposure.
When I started writing this article, the most recent rescue on Mount Washington was a much-publicized, unprepared hiker who found himself in deep trouble after losing visibility above treeline. His SOS call sparked an 11-hour rescue that utilized the Cog Railway and was the subject of a harsh statement from New Hampshire Fish and Game. Then, while I was on a call with my father discussing the numerous ascents of Mount Washington he’s made in his 40 years of hiking in the White Mountains, a report came in that backcountry skier had died after falling 600 feet down Tuckerman Ravine. It seems Mount Washington will continue to claim lives. [Editor’s Note: At press time, authorities have identified the skier as 20-year-old student Madison Saltsburg. Backpacker offers our sincere condolences to her friends and family]
This piece is meant to be a very basic guide on how to hike Mount Washington as safely as possible. It is not meant to be a replacement for route research, weather reports, or a full packing list. I’ll cover some basic winter and shoulder-season preparation, but if you’re reading this guide to learn about hiking in the Whites, I recommend you stick to summer hikes. If you do want to tag this peak and don’t have the experience, you can go with a guide service in any season. Finally, you shouldn’t hike this peak in the off-season on your own: Always go with a partner or group, no matter how experienced you are.
Here’s the rundown of how you can hike Mount Washington without becoming the next news story.
Understand the Weather and Trail Conditions
Checking the forecast for Mount Washington doesn’t mean Googling the temperature in North Conway. I recommend using three different specialized mountain forecasts and comparing the information.
The Mount Washington Observatory website and its Higher Summits Forecast is an extremely reliable resource for the Northern Presidentials, and should be the first one you look at. Next, check NOAA, which is also quite accurate, but make sure the readout elevation is set to the summit height, not trailhead. Mountain Forecast is a good third source, but can be more optimistic than NOAA or Higher Summits, though its windchill predictions and wind speed / direction are quite helpful.
After reviewing the forecast, check New England Trail Conditions (NETC) for recent trip reports. As long as the report is from the past few days and there hasn’t been a major weather event, NETC can provide good information with trail photos from avid White Mountain hikers. Depending on the season, this information can tell you how packed out the trail is, what type of traction people used at different elevations, blowdown reports, and what the stream crossings looked like.
Once you have a good idea of the conditions and forecast, you’ll have to determine whether or not attempting the hike is actually a good idea. If the forecast calls for high winds, low temperatures, and potential snowfall (this can happen in any season), reschedule your plans.
Picking Your Route Up Mount Washington
There are numerous ways to summit Mount Washington, from direct summit bids to longer traverses, additional summits, and side trails. No matter which route you take up, you’ll have to navigate prolonged steep and exposed sections, so make sure your fitness is up to snuff. Even the shortest route to the summit is still more than an eight-mile round trip with over 3,500 feet of vertical gain. I’ve listed estimated distance and elevation gain for each route; Keep in mind there are plenty of alternates, loop options, and spur trails that will change both metrics.. The numbers below are from Gaia GPS, and mileages from other sources may vary.
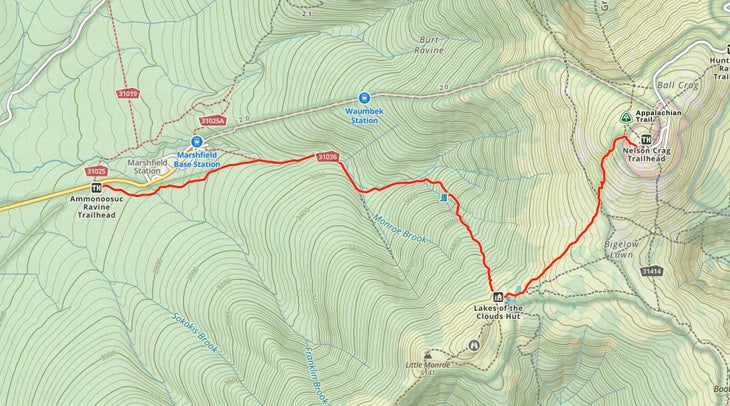
Ammonoosuc Ravine Trail
- Distance: 8.2 miles round trip
- Elevation Gain: 3,795 feet
- Starting Point: Cog Railway Base
This is the simplest and safest route from trailhead to summit. Approaching from the west, you’ll start at the Ammonoosuc Ravine Trailhead and take the Ammonoosuc Ravine Trail three miles to Lake of the Clouds Hut. From there, connect with the Crawford Path to the summit. Expect waterfalls, scenic viewpoints, and a fairly mellow start before you start the steep climbing. This is the least risky route, and one of the most popular shoulder-season and winter routes.
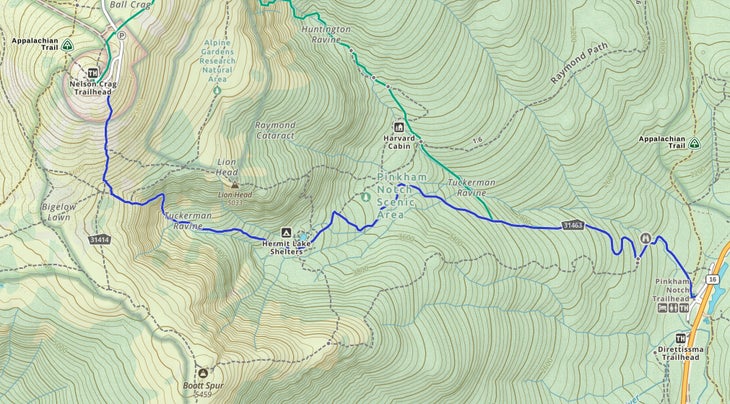
Tuckerman Ravine Trail
Approaching from the east, you’ll start at the AMC Pinkham Notch Visitor Center and start up the popular Tuckerman Ravine Trail, a steeper and more challenging route than the Ammonoosuc Ravine Trail. Check out the Hermit Lake Shelter before continuing towards the Headwall, or you can head north on Lion Head Trail to the eponymous rock formation before the final .6 miles to the summit. This is a summer-only trail for everyone but the most experienced backcountry travelers. In this off-season, this requires ice-climbing skills, technical gear, and travel through avalanche terrain.
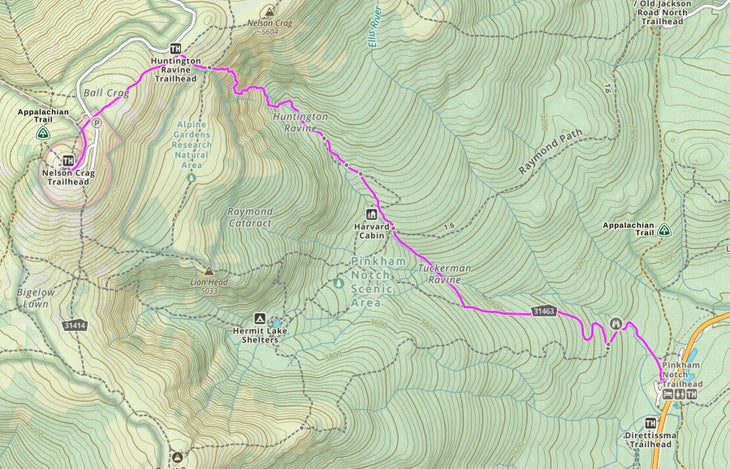
Huntington Ravine Trail
- Distance: 4 miles to summit; round trip varies based on choice of descent
- Elevation Gain: 4,265 feet
- Starting Point: Pinkham Notch Visitor Center
One of the most difficult and dangerous routes in the White Mountains, this trail starts at the Tuckerman Ravine trailhead before connecting with the Huntington Ravine Trail. The Huntington Ravine Trail gains 2,450 feet in 2.1 miles, with a high level of exposure, incredible views, category 2 and 3 climbing, and multiple no-fall zones. There are a few different routes to the summit after finishing this section, including the Alpine Garden Trail. Don’t attempt this if there is any moisture on the rocks, and do not try to descend this route—head down via Lion’s Head or Tuckerman Ravine instead. To really drive the point home, the Huntington Ravine Trail maintains a place of honor on New Hampshire’s Terrifying 25 list.
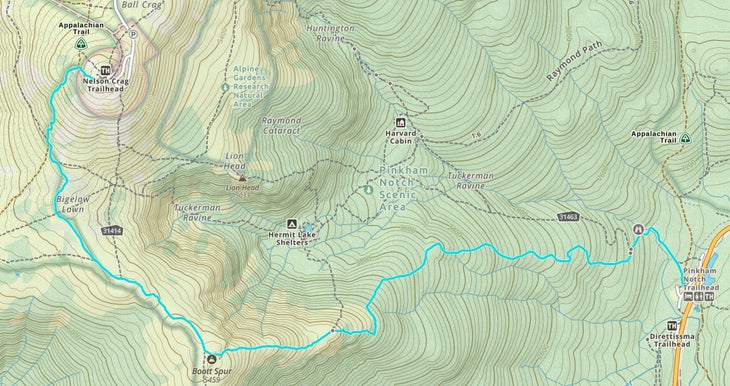
Boott Spur Trail
Begin this hike on the Tuckerman Ravine Trail for just under a half-mile before turning onto the Boott Spur Trail, combining the views of Tuckerman Ravine with more varied scenery. Stop to admire the iconic rock formation on the south side of Mount Washington and the amazing views of the White Mountain National Forest, then continue climbing steeply before intersecting with Davis Path and Crawford Path to the summit.
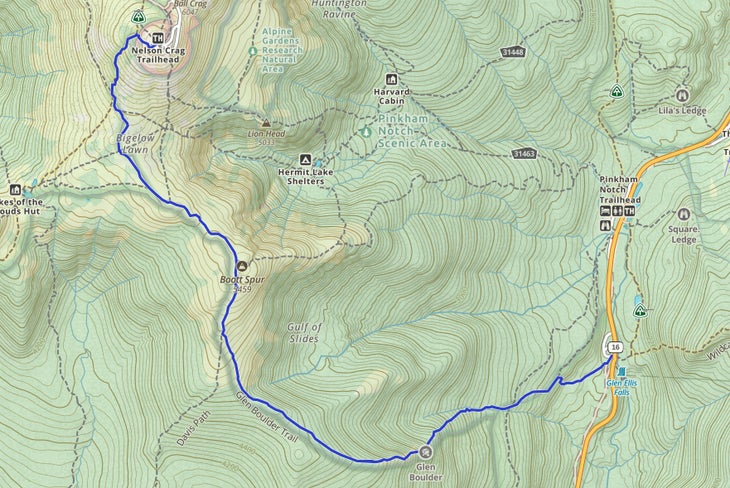
Glen Boulder Trail
The Glen Boulder Trail is the fastest route to break treeline, climbing steeply out of Pinkham Notch and up the Gulf of Slides. You’ll hike past Glen Boulder before the views open up to the expansive scenery of the surrounding peaks. Continue through the alpine zone on the Glen Boulder Trail until it intersects with Davis Path, then take Crawford Path to the summit. There are plenty of other options to branch off and take side trails as well.
Packing for Mount Washington
The seasons look different in the Presidentials. Spring comes late, winter comes early, and snow can strike literally any time of year. Unfortunately for the weight weenies out there, this means that you’ll need to carry more gear than you’re used to if you want to hike Mount Washington safely. The White Mountain hikers I spoke with have separate packs for summer, shoulder season, and winter, and they don’t drop their winter gear until late spring.
Even a summer hike on Mount Washington requires more than a running pack and single layers. Bring a light hat and gloves, a combination wind/rain shell, and an ultralight puffy for possible cold temperatures above treeline. Using hiking poles for stability and support on rocky and steep sections is a good idea; I actually prefer the durability of aluminum poles over carbon, which can snap easily on sections of exposed rock. Bring plenty of food and water and a small first aid kit, and carry a map with the trails and intersections clearly labeled. You don’t need to be a master with a compass, but you should at least be able to find a trail junction on the map and identify which way to go. I also recommend carrying a navigation device separate from your phone with the routes preloaded, so you aren’t relying on a fragile phone and battery, and having an InReach or SPOT for emergency communication.
Winter ascents mean packing multiple sets of traction and accepting that you might have to switch between trail crampons, microspikes, and mountaineering snowshoes depending on trail conditions. Necessary apparel includes multiple spare wicking layers, a headlamp with extra batteries, hand warmers, and extra food. An emergency blanket or small sleeping bag and a reflective foam pad are also must-carries; if this seems unnecessary to you, consider that those extra few ounces of protection from the ground can be the difference between life and death in a Mount Washington storm.
Many winter hikers also carry a fanny pack with snacks and small items so they can reach gear without having to stop and take their pack off. Make sure your water is in an insulated holder so it doesn’t freeze. Packing for shoulder-season hikes is similar to preparing for winter; remember that trail conditions are incredibly variable in spring and fall from trailhead to summit, and you can encounter ice, snow, and fast-moving winter weather even into June.
Wear the Right Clothing
For footwear, I use boots with 200 grams of insulation on cold shoulder-season hikes and winter hiking boots with 400 grams of insulation in the winter. In the summer, I’ll wear trail running shoes or low-top hiking shoes with deep, multi-directional lugs, a stiff midsole, and a supportive, reinforced upper. Slick-soled road-running shoes or casual footwear, which can slip on unstable footing, are never a good idea.
For clothing, remember that for every 1,000 feet of elevation you gain, the temperature decreases by about 5.5 degrees Fahrenheit, not taking into account precipitation or moisture from hiking into cloud cover. Since the routes up Mount Washington all gain more than 3,500 feet, you’ll need to plan on bundling up as you climb.
Wear wicking layers appropriate for the temperature range you’ll encounter, and hiking-specific wool or synthetic socks to help prevent blisters. Sunglasses are a necessity no matter what the season, as well as a hat for sun exposure.
Don’t forget about wind chill, which can be ferocious once you get above treeline. The National Weather Service’s wind chill factor formula is too complicated for most of us to do in our heads, but simple to calculate with a chart. I recommend putting on layers right before you reach treeline, even if it feels like too much clothing. Once you lose the protection of the trees, you’ll feel every blast of wind.